By: Carlos G.
In my previous article (Bug tracking-CI-Source Control withVisual Studio TFS and Atlassian) we talked about TFS and Attlasian products.
In this occasion I present an overview of Microsoft Visual Studio as an alternative for your team to collaborate and develop the cool apps for your clients.
From this Microsoft link I extracted the following: "Visual Studio Online, formerly Team Foundation Service, is the home for your project data in the cloud. Set up an environment that includes everything from hosted Git repos and project tracking tools, to continuous integration and an IDE, all packaged up in a monthly per-user plan. Connect to your project in the cloud using your favorite development tool, such as Visual Studio, Eclipse or Xcode."
With Visual Studio Team Foundation you would have source code control, project management, and team collaboration platform at the core of the Microsoft suite of Application Lifecycle Management tools.
I recommend you to go here for a complete documentation if you are interesting of using Visual Studio Online.
Each Visual Studio Online account comes with five free Basic users and includes shared monthly resources for build and load testing. It has a limitation of 60 minutes per month for build (which I found this a limitation for this service but not the end of the world for everything else you are getting) and 15,000 virtual user minutes per month for load testing.
First you need to start with an account. If you don’t have it then create an account at http://www.visualstudio.com/
If you don’t have Visual Studio on your PC then download and install it. If you don’t have a license then you can start by using Visual Studio Express for Web and you should be able to connect to Visual Studio Online.
In my case I’m using Visual Studio 2012 Professional and I already have my account https://carlosgomezlabs.visualstudio.com
Note: it is best if you combine it with Visual Studio 2013 on your PC, but as I said before I did this article using 2012. I’ll try to update this article later on when I do the upgrade.
If you are using VS 2012 like me then download the Visual Studio team foundation Server with Update 4: http://www.microsoft.com/en-ca/download/details.aspx?id=38185
In this example I’m using Git as my source control. You can have local repositories and from other 3rd party vendors (gitHub, Bitbucket) and then merge them and Push it to the Git repository of your Visual Studio Online. In this example I only have my local repository and the remote master in my carlosgomezlabs.
Ok Let’s see some screen-grab and go through it:
The CODE section: here you would see your committed code.
The WORK section:
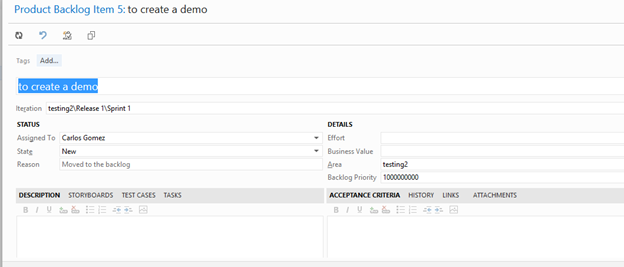
In the backlog items you can enter the bugs and updates required for your product.
By drag and drop you can move the items from the backlogs into the Sprints. Here is a screen-grab of one of the items that can be assigned to one of the Sprints as a task to fulfill with the release.
The BUILD and TEST sections.
You can create builds for your code and the test cases around them can be manual or automated.
Note: In this document I’m going as far as showing the BUILDS. The test case can be something for another day.
Now that we show quickly the online tool let’s go to the Visual Studio 2012 installed on the PC and open your Team Explorer. Connect to your Visual Studio online and select the project that you are working on.
Then clone the Git repository:
Now there is a local repository on the machine. You are also able to commit to the repository on Visual Studio Online. You are also able to see the items assigned to the team (features or bugs from the backlogs or the sprints coming from the WORK section of the Visual Studio Online). See the image below. On the left side bottom you can see the open tasks. On the right side you see the repositories.
Finally let’s take a look at the BUILDS:
You can run your Builds manually or you can configure the build to run every time there is a commit of the code from the members of the development team.
Here are the main screens for configuring the build process:
- Click on new build definition. Give it a name and set the Queue processing
- Set the trigger. In this case it is for Continuous integration (CI).
- In the source settings section I left it to get the source from the Team Foundation Git provider setup for this project.
- For the build defaults this demo is set for only build (compile) but not outputting the files to a physical drop folder.
- The process section was the one that gave me more issues as I was having issues by putting the correct Solution build path. I tried $/testing/ConsoleApplication1/ConsoleApplication1.sln and other settings as other examples that I saw on tutorials (granted most of them were for version 2013 and I’m using Visual Studio 2012). Finally what worked for me was using this format: [project folder name]\[solution name].sln
- The final step was for me to try (after 16 errors for this simple demo) the build:
Other good reads about Visual Studio TFS below:
- Scott Hanselman
- Post from MSDN blog by Matthew Mitrik (MS), Andy Lewis, and Martin Woodward


